
UPDATE: 12/30/2016 All MineCraft kits are currently sold out!
Looking for a quick birthday or Christmas present for your little gamer this year? If your kids and adults..you know who you are…have been hit by the MineCraft craze, then I know they’d be super excited to have this throw to snuggle up with on the couch. It also makes perfect decor for their bedroom or game room.

I’ve made a lot of MineCraft quilts! And I’ve had a few questions on size and cutting, so I thought I’d share with you how easy this is to make! A great beginner project from start to finish.
MineCraft Creeper Quilt
Supplies:
1 Half Yard Black
5 Half Yards Assorted Kona Greens in Honeydew, Basil, Grass, Tarragon & Chartreuse
Binding: scrappy or 1/2 yard, cut into 2-1/2″ strips
Backing 2-2/3 yards for machine quilting.
Batting 48″ x 57″
Quilt measures approx. 45″ x 54″
With a 10 x 12 setting, you will need (120) 5″ (charm) squares…
20 black & 100 green. I used a variety of Kona Cottons in green to create the pixel effect.
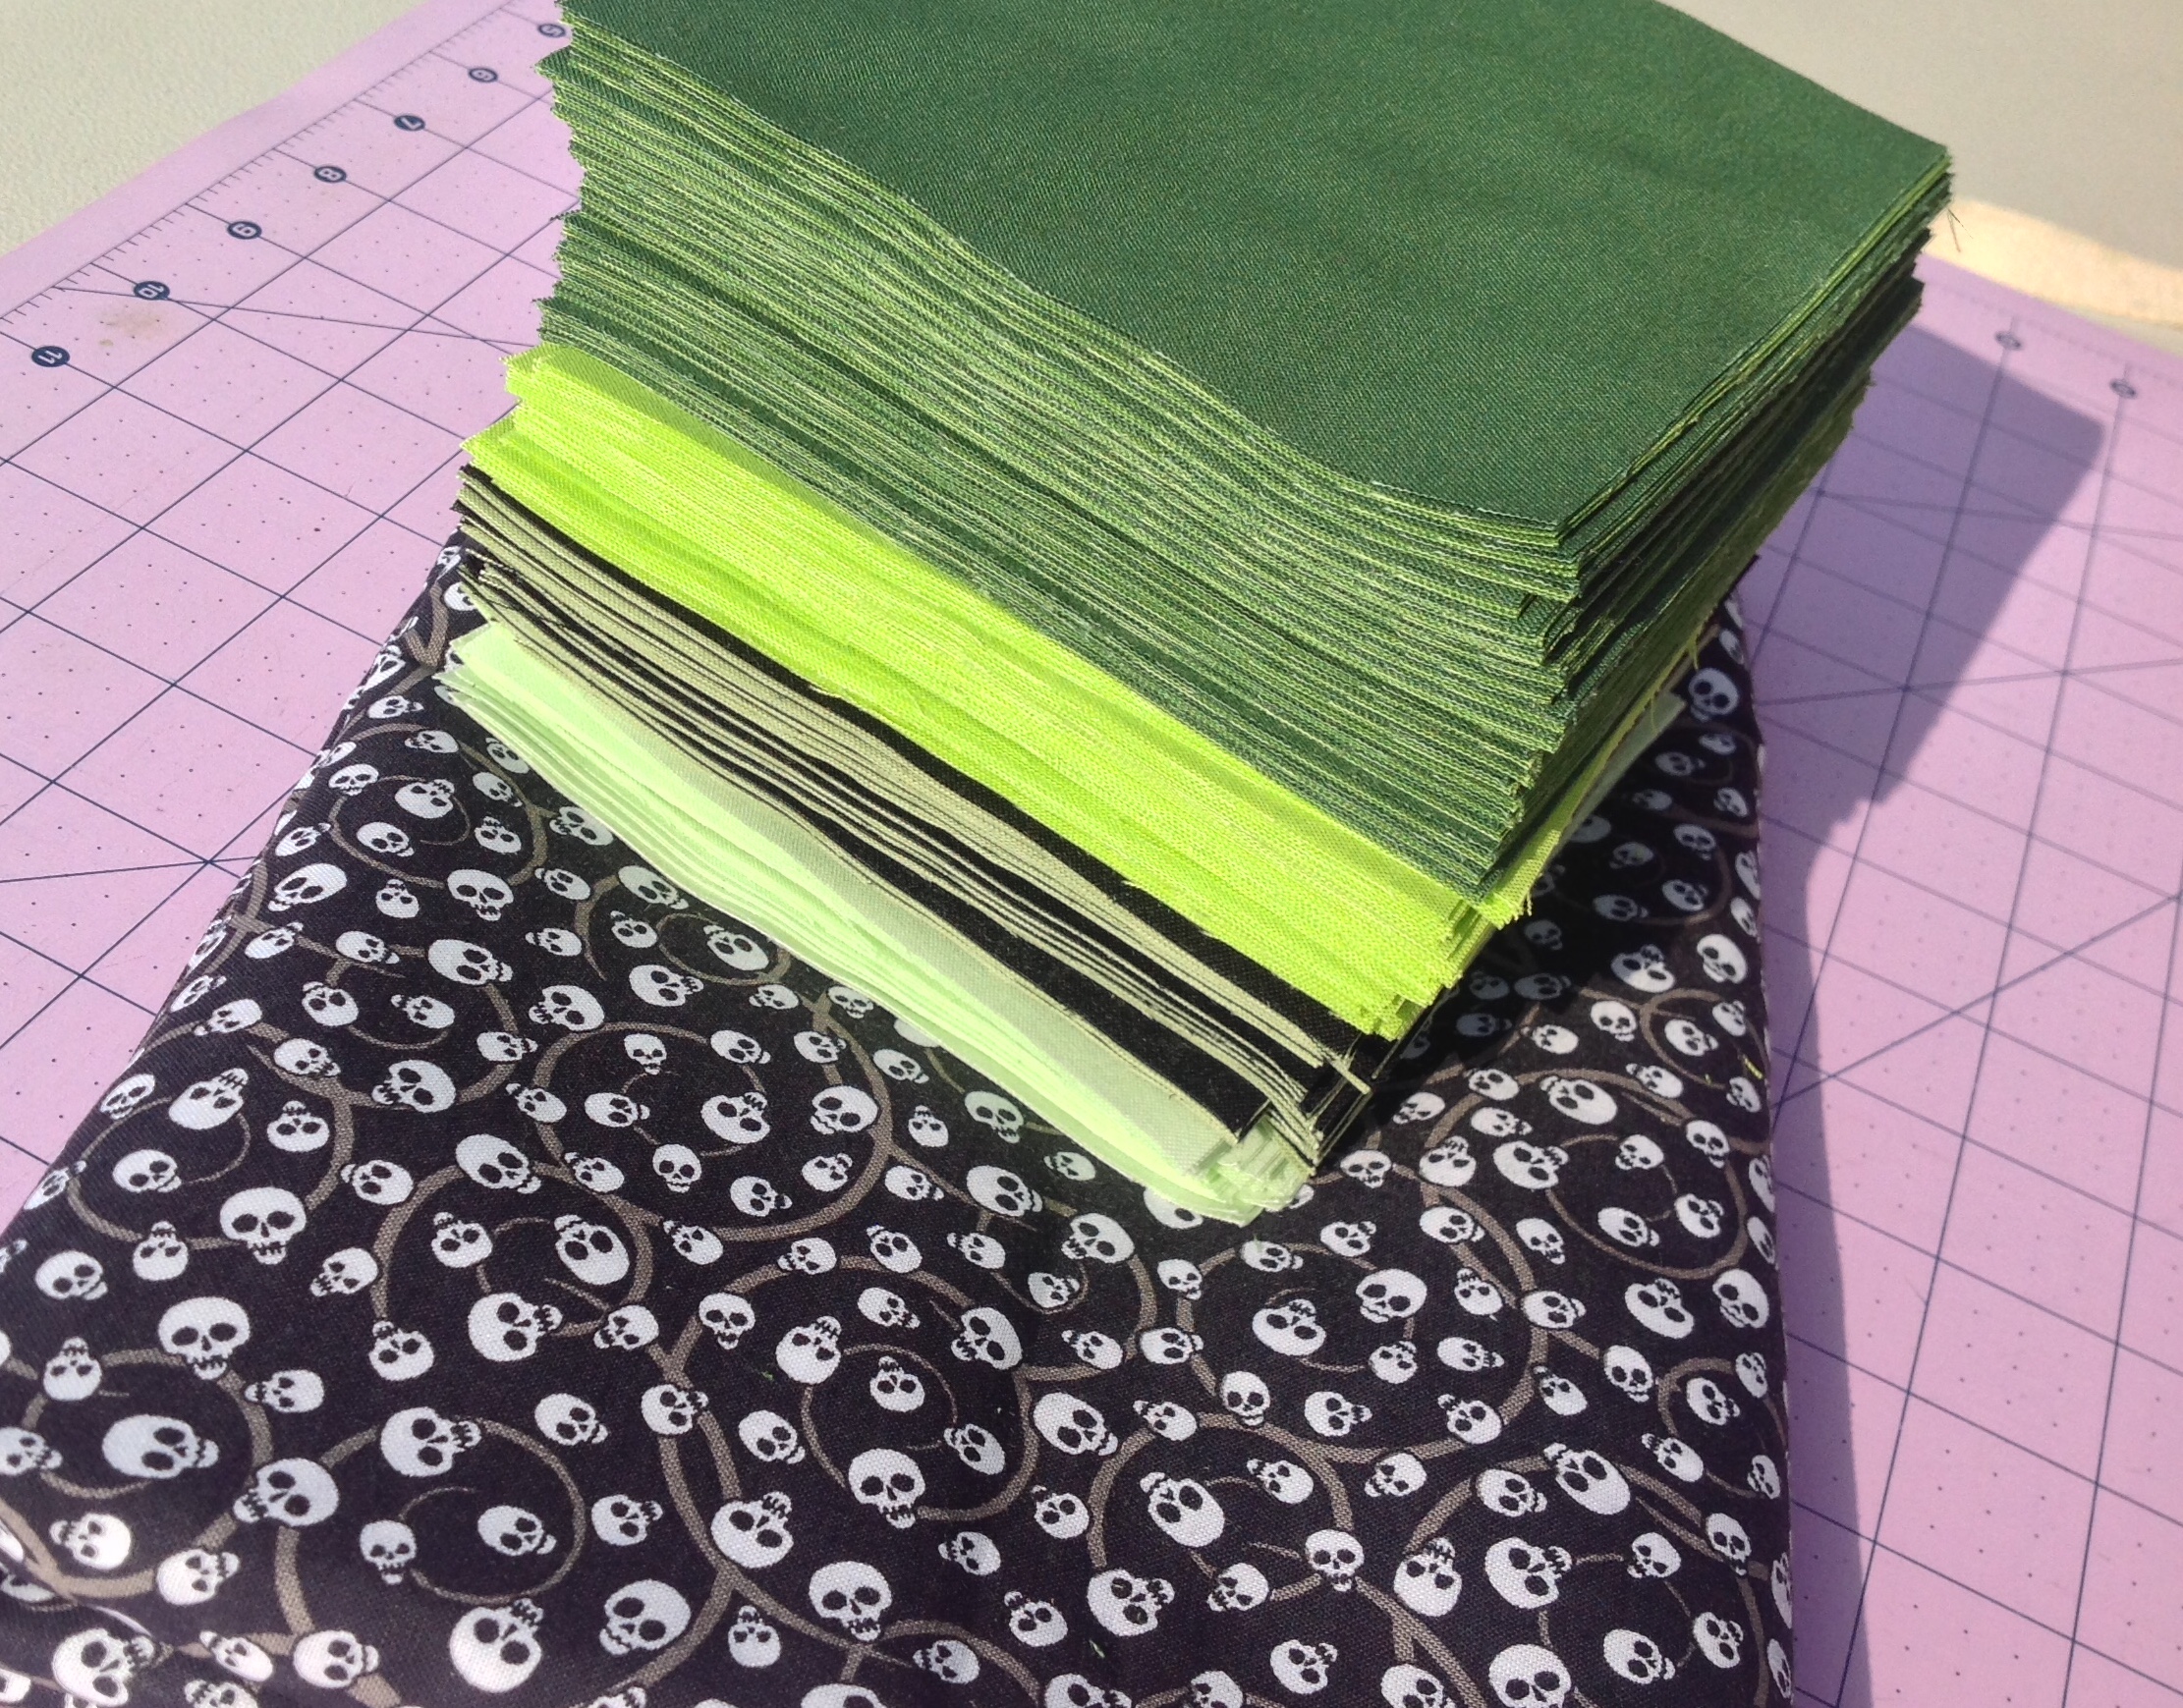
1/2 yard = 24 charm squares
Minecraft needs (5)-1/2 yards for variety
Cut each half yard into 3 strips of 5″ WOF.

You will have a little strip left over after cutting the (3) 5″ strips. Save those for your scrappy binding.

Trim the selvedge from your 5″ strips.

Cut each strip into (8) 5 inch squares. These are doubled from cutting…Each half yard will yield 24 squares.

Lay your quilt out according to the drawing in a 10 x 12 block setting. And if you’re wondering…why, yes, I was working on this at Starbucks and all this green talk made me thirsty for a Green Tea Frappuccino!

Sew your charm squares together into rows, Pressing each row in alternating directions.

Sew the rows together. Press.
For the backing fabric, cut the 2-2/3 yards into (2) 48″ long pieces. Trim the selvedge edges and sew the pieces together lengthwise. Press your seam open. Now you should have a pieced backing that measures approx. 48″ x 84″. We only need a backing that measures approx. 48″ x 57″, so let’s trim about 26″ off of the bottom of the backing. (See photo).
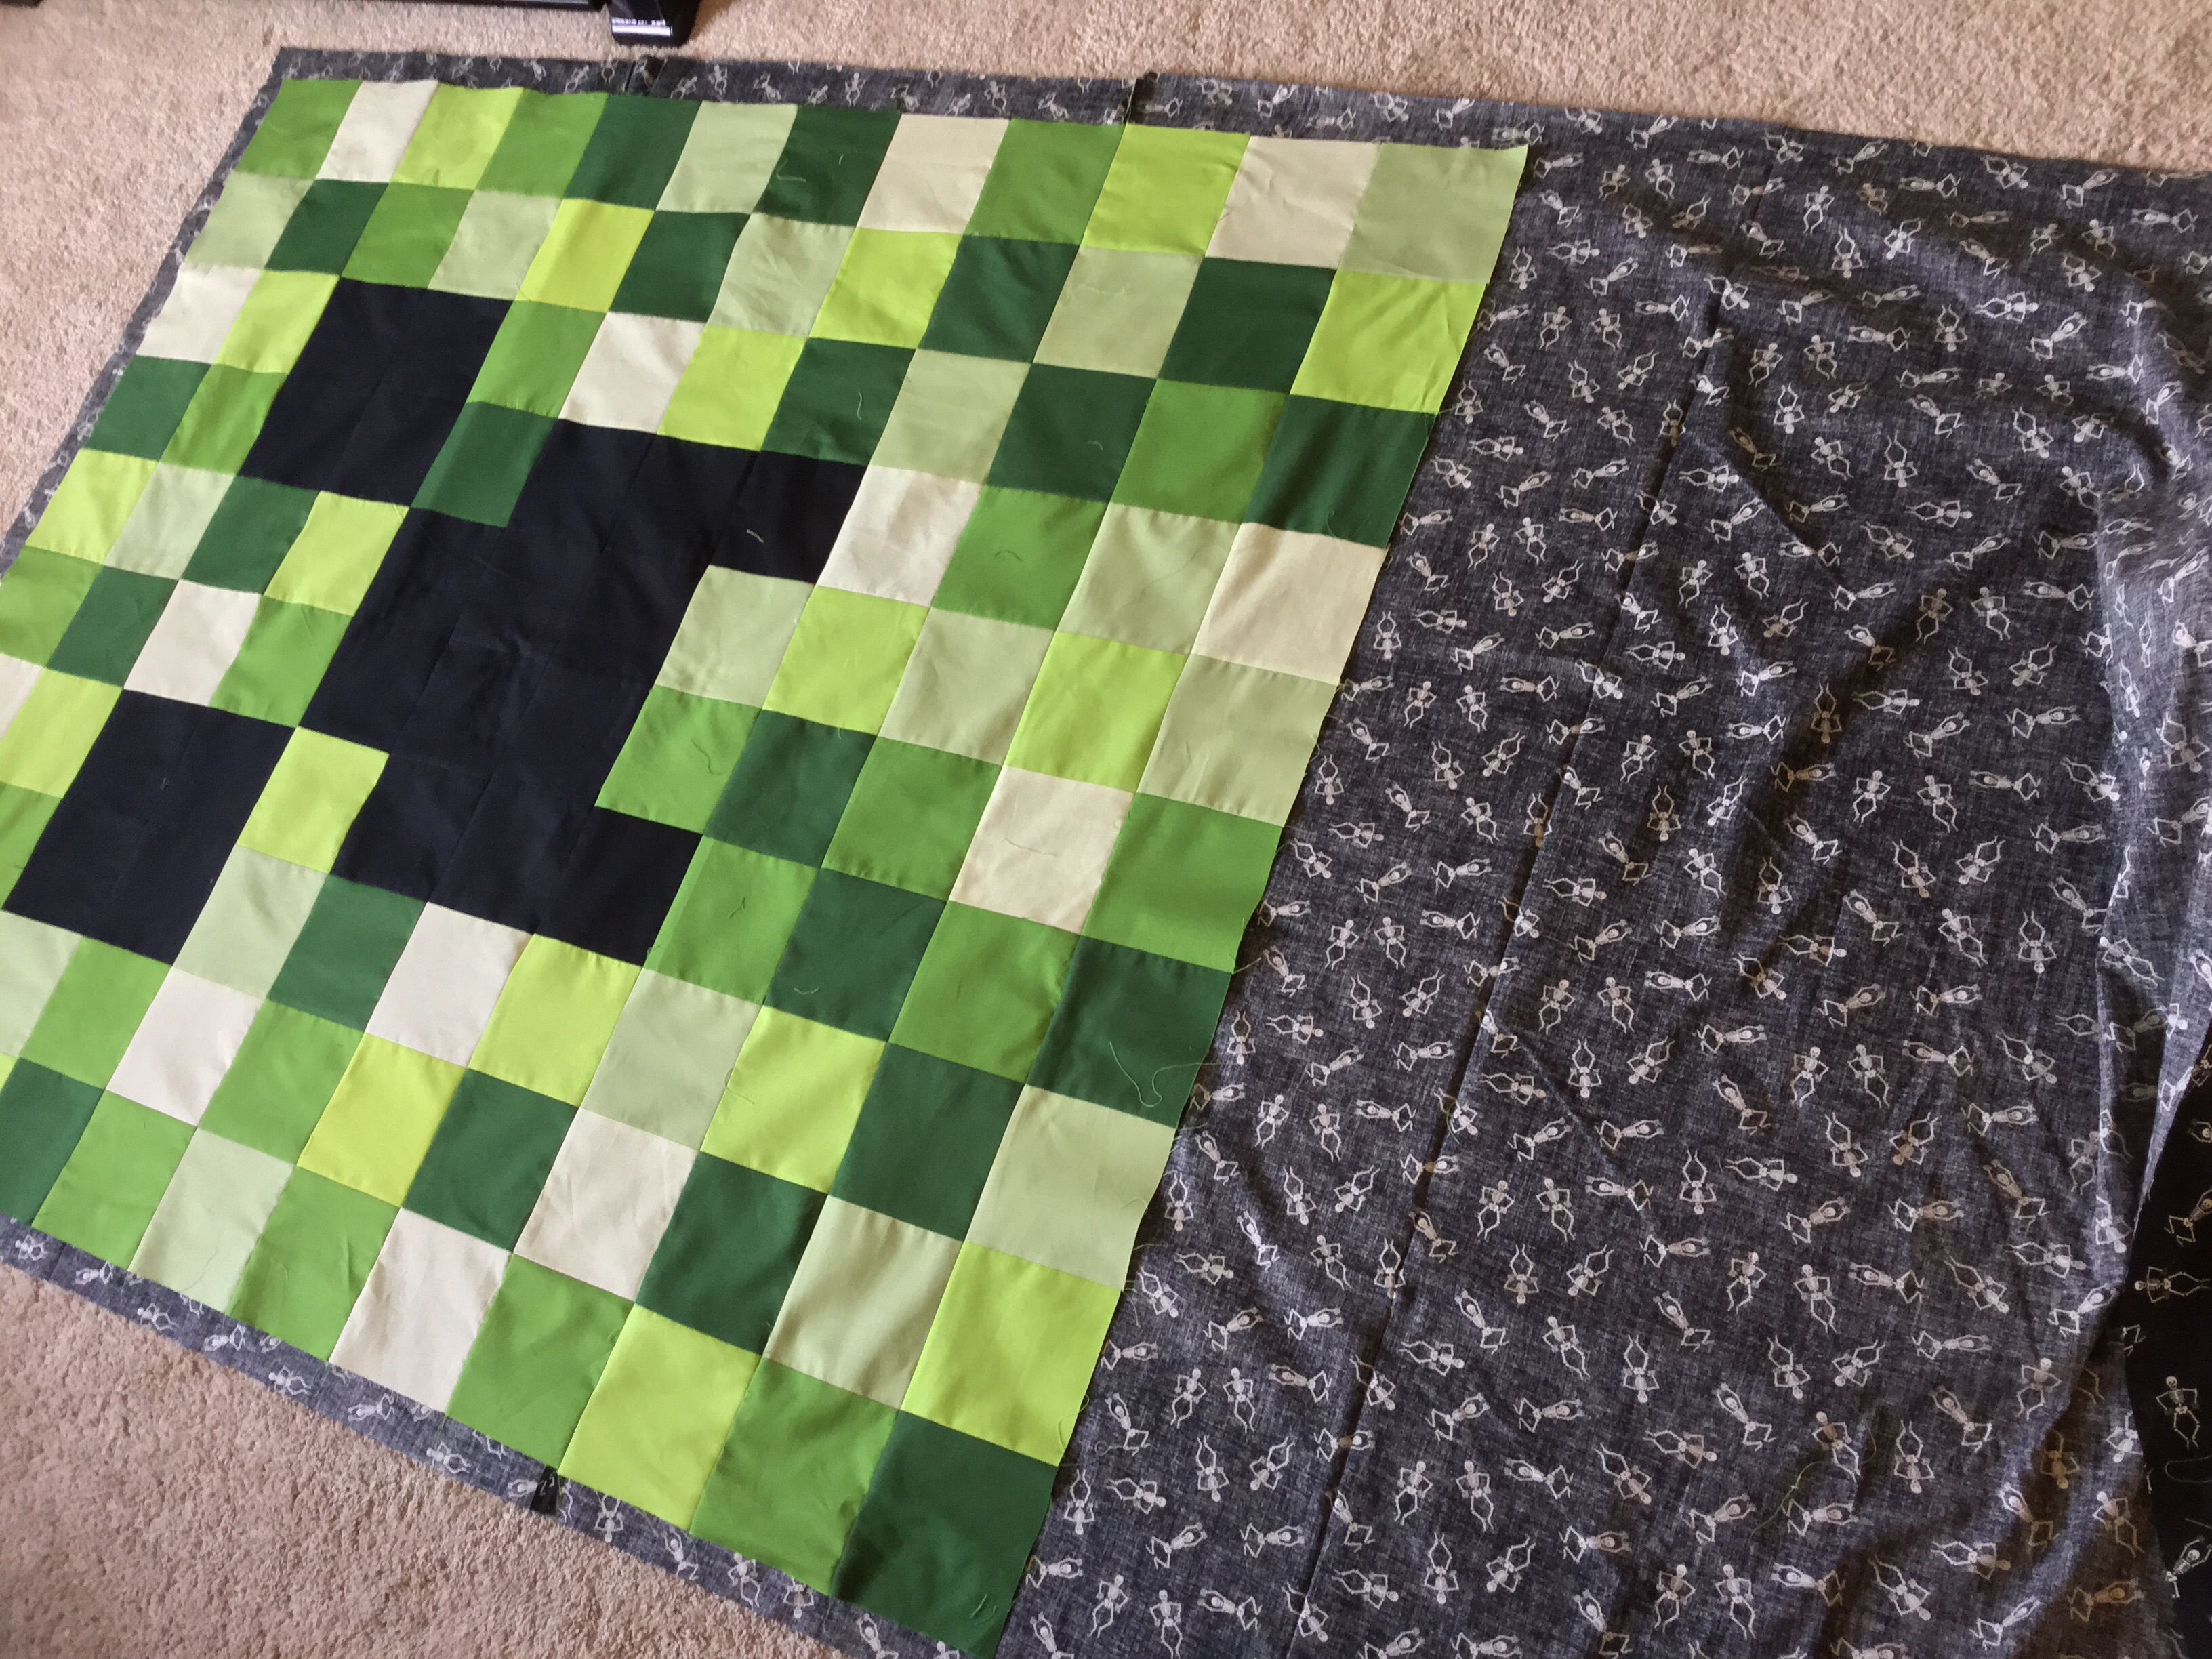
The backing seam will run horizontally in the middle of the back of your quilt instead of vertically. This saved us a little bit of $$ and if your backing is not directional, then it’s no biggie!
**TIP: Use the extra backing and scraps fabric to make a cute matching pillow!
Layer your quilt top, batting and backing.
I can give you a few tips that I use to help me with successful quilting.
This quilt is small enough so that you can work at your kitchen table. I begin by placing a well pressed backing face down. If desired, tape the backing to the table with painters tape. Next, I add batting, smoothing out from the middle so that there are no wrinkles. Finally, I add my pressed quilt top, right side up, on top of the batting, once again smoothing the fabric out from the middle to make sure there are no bumps or wrinkles and taping the top down to decrease puckering.

Pin your quilt sandwich well, making sure you’re catching all the layers. The more pins you use, the less likely you will have any puckers as you’re quilting. I use a pin in each of the squares on my Minecraft quilt. ….sorry for the icky pic…indoor lighting in the winter here is, well, icky! I really do need a crash course in Photoshop…

**a note on pins..buy the ‘fine wire‘ pins from the notions wall. They are not the same pins as the ones found in the office supply section at Walmart..no matter how hard your boyfriend tries to convince you that they are lol!
Some of you may need to attach your walking foot at this point to quilt.
To begin quilting, I increase my stitch length .5 and always work from the middle out. So this means when quilting the Minecraft quilt, I start at the top, 5 rows over, and work my way down the quilt and all the way over to one side. Then I work toward the other side from the middle out.
I quilted mine with straight lines approximately 3/8″ on each side of the ‘ditch’, horizontally and vertically to keep with the pixel effect of the game using green thread. I eyeballed it by sewing with the edge of my presser foot butted against the seam as my guide.

Bind your quilt. I like scrappy binding so I pieced all of my leftover strips together. I typically like to cut my binding at 2-1/4″- 2-1/2″ depending on which technique I bind with, whether it be by machine or by hand.

If you’re machine binding, you might find this tutorial helpful.
And in keeping with the ‘theme of the game’, the backing is a black and white skull fabric. So perfect!

sssSSSsss…BOOM you’re finished!
**********************INTERNATIONAL CUSTOMERS**************************
KIT SHIPPMENT: Once again, if you are an international customer, please convo me as shipping rates are different for each country. International shipping rates are set by the USPS and KITS are mailed in a flat rate mailer. SewMod does not charge our customers for any ‘handling fees’. USPS prices for Canada are $20.85 and “everywhere else” including Australia and Europe are $25.25. A separate PayPal invoice will be made available to you after you convo me with the package destination. I’m happy to help! Thanks.

***If you’d like a MineCraft Quilt KIT, twin/full size 54″x72″, click on the PayPal button below. The full size KIT is 68.50 plus $12.25 in shipping for U.S. customers.THIS SIZE KIT IS SOLD OUT and no longer available.
***Standard mattress sizes for a twin measure at approx. 39″x75-79″ and a full measures at 54″x75″.
This quilt KIT will fit a twin and provide a drop over the mattress on the sides. It will be a few inches shy on the length, but a pillow at the top fixes that:) We keep the sample MineCraft quilt on the twin in the studio, and it looks great!!
***If you’d like a MineCraft Quilt KIT, throw size 45″x54″, click on the PayPal button below. Each KIT is $48.50 plus $5.05 in shipping for U.S. Customers.-THIS SIZE KIT IS SOLD OUT and no longer available.
KITs include enough fabric to make a complete MineCraft quilt, including top, backing, scrappy binding and tutorial. Batting NOT included. If you’d like to replace the Cobblestone grey option below with one of the greens used in the kit as your backing fabric, convo me. I’m happy to help!

To choose your backing fabric, convo me in the ‘Contact Us’ tab at the top of the blog or send me an email at SewMod at hotmail.com. If no backing choice is chosen at checkout or by convo, the kit will be sent with the cobblestone grey.
Attention: The PayPal buttons are for U.S. customers only! Please convo me in the ‘contact us‘ tab or by leaving a comment in this blog posting if you need a shipment outside the U.S. Thanks!
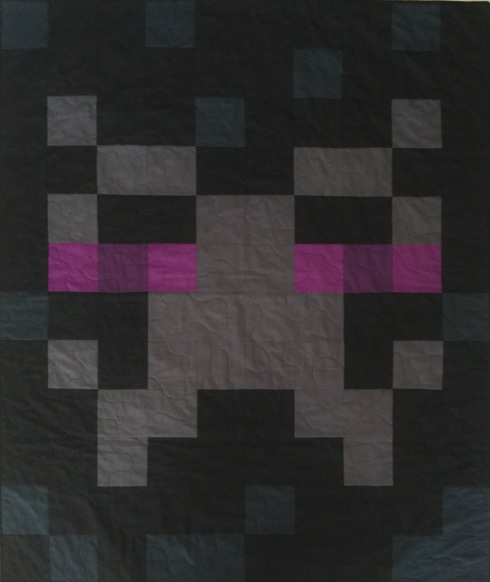
7/31/15 Update! We’re happy to have the Enderman kits available as well as the Creeper. If you’re interested in the Enderman, please click HERE for the blog post. Thanks so much! Lorrie:)


40 comments
Comments feed for this article
November 30, 2014 at 3:15 pm
Michelle Clizzie
My material keeps shifting when I try to quilt my blanket. On top of pin in place how can I keep my material from ruffling up?
November 30, 2014 at 8:28 pm
Lorrie
Hi Michelle
I’m so sorry your having a tough time quilting. I know this is one of my frustration points as well.
I can give you a few tips that I use to help me with successful quilting.
I work at my kitchen table. Begin by placing a well pressed backing face down. Next add your batting, smoothing out from the middle so that there are no wrinkles. Finally, add your pressed quilt top, right side up, on top of the batting, once again smoothing the fabric out from the middle to make sure there are no bumps or wrinkles.
Pin your quilt sandwich well, making sure you’re catching all the layers. The more pins you use, the less likely you will have any puckers or ‘ruffling’ as you’re quilting. I use a pin in each of the squares on my Minecraft quilt.
To begin quilting, I increase my stitch length .5 and always work from the middle out. So this means when quilting the Minecraft quilt, I start at the top, 5 rows over, working my way down the quilt and all the way over to one side. Then I work toward the other side from the middle out.
I hope all of these tips will bring you closer to a successful and less stressful quilting experience. I’m living proof that practice does make perfect, or at least closer to it!
If you have any other questions Michelle, I’m happy to help!
Thanks for stopping by,
Lorrie:)
January 19, 2015 at 9:57 pm
Diana McMahon Hendricks
spray baste it
February 15, 2015 at 1:14 am
Kristie
Thank you so much for posting this tutorial. It is such a great design, a fun project and your instructions helped me feel confident that I could do it as a beginner quilter! I am currently working on it to give to my son for his eighth birthday next week. I know he is going to love it! I added two rows to the top and sides to make slightly larger and I think it will still look great. Thank you again!!
February 15, 2015 at 9:38 am
Lorrie
Hi Kristie. I’m so glad that you’re using the tutorial. This type of quilt is easily enlarged or reduced to make different sizes and will still look just as great! I even saw where someone made a ‘mini’ on Instagram with it. Thanks for your kind words and I bet your son is gonna love it!!
March 19, 2015 at 4:02 pm
Shelley gans
Hi Lorrie – can the Minecraft quilt be strip pieced then cut crosswise into rows? Thank you!
March 20, 2015 at 8:23 am
Lorrie
Hi Shelley
Strip piecing probably wouldn’t work with the layout I have shown because it’s so random but could possibly work if you choose to layout your quilt in a different green pattern…which is completely fine too!
March 20, 2015 at 5:59 pm
Shelley
After I thought about it I realized that it woulden’t work – for the reason you gave. It is really random! I assigned numbers 1-6 to the colors light to dark then wrote down each row by number – not one row had the same number sequence! I cut the squares, assigned the numbers, put them into individual baggies then followed the number pattern. It went together a lot faster than I had thought it would. You sure did put a lot of thought into the color arrangement and it does seem to be totally random. Thank you for sharing your expertise.
March 21, 2015 at 4:09 pm
Nicole
Are these kits still available?
March 21, 2015 at 4:15 pm
Lorrie
Hi Nicole
Yes! I still have 3 kits available.
Thanks,
Lorrie
March 21, 2015 at 4:19 pm
Nicole
Do I just click on the buy now button? I live in Canada
March 21, 2015 at 4:52 pm
Lorrie
Hi Nicole.
For international customers the shipping rates are different. Canada shipping is $19.95. I will set you up your own listing and send it to your email address that’s attached to the blog comment. Are you still interested in a kit? I look forward to hearing from you, Lorrie
March 21, 2015 at 5:12 pm
Nicole
Yes please :) thanks so much
April 20, 2015 at 7:00 am
Jessica
Hi there I absolutely love this quilt thank you for sharing. I have a question though I want to make this quilt for my son’s birthday but I want to do a double sided blanket, a creeper on one side and an endermin on the other side. Is this possible to do?
April 20, 2015 at 8:03 am
Lorrie
Hi Jessica
Yes. This can be done. You will need an extra 2 yards of black Kona and 1 fat quarter each of 2 different purples.
Referring to the original creeper quilt placement, notice the fourth row down. On this row for the Enderman, you will place the 5″ blocks in this order to make the Enderman’s eyes…
black-light purple-dark purple-light purple-black-black-light purple-dark purple-light purple-black
Every other square in the original creeper quilt will be replaced with a black square.
Now to quilt this yourself and keep the two “tops” straight without shifting will be the hard part. You will need to line this up perfectly before quilting it and pin meticulously! Otherwise one or the other will shift during quilting. You could however, cut a piece of batting the same size as your tops, layer the creeper face down, followed by the batting then the Enderman top face up. Pin the sandwich together around the edges with straight pins. Stitch around the edges, leaving an opening at the bottom. Pull the sandwich through the opening. Top stitch closed around the quilt. At this point you could skip quilting and “tie it off” at various seams with embroidery floss to keep the quilt secure.
It all depends on what look you’re going for…
I hope this helps! If you have any other questions, I’m happy to help.
April 20, 2015 at 8:43 am
Jana
Just wondering if you would be able to make a larger quilt (for a double bed)? I would also need it to be shipped to Canada. Instead of the skull backing I would be ok with plain black. Please let me know at your earliest.
Thank you
Mom of minecraft obsessed kid
April 26, 2015 at 9:36 pm
Cathy
oh my I can’t believe this–a Minecraft quilt…My granddaughter and grandson are obsessed too with this game..But since I know nothing about it can I ask a question or two..Is green a significant color for this for some reason? And the skull fabric is for something else in the game? What would have to be done to make this quilt longer and a little wider and still make sense? Grandson would love to have this on his twin size bed..
April 27, 2015 at 7:59 pm
Lorrie
Hi Cathy.
Thanks for stopping by. I’m so glad you found us! Green is the grass in MineCraft. The skeletons are also in the game as well as spiders and grey for cobblestones…which the kids mine for…you can certianly make the quilt bigger by adding extra green blocks to the quilt. Extra rows on top/bottom and a couple to each side as well until you get to the measurements you desire. Just remember to account for those rows by adjusting your fabric purchase accordingly.
If you have any other questions, I’m happy to help!
Thanks,
Lorrie
May 3, 2015 at 11:05 am
Tina Stuckey
I want to purchase the mine craft creeper quilt package, and I need it shipped to Newfoundland, Canada. Is it 19.95? Thx
May 3, 2015 at 4:57 pm
Lorrie
Hi Tina
Yes. The Minecraft kit shipment to Canada is a flat rate charge by the USPS for $19.95. If you’d like one, I can set you up a paypal invoice and get that out to you ASAP! I have the kit backing available in purple(obsidian), grey(cobblestone) and a new spider web in black. Just let me know which backing to include in your shipment.
I look forward to hearing from you,
Lorrie
June 15, 2015 at 11:16 am
Sharon Rose
I need a size for a double bed. Is that possible?
September 21, 2015 at 12:24 pm
Mary Lee
I would like quilt pattern/tutorial for minecraft Blaze.
September 21, 2015 at 10:44 pm
Lorrie
Hi Mary!
I’ll work on your suggestion for the Blaze. I have a few quilt shows over the next two weeks but after those wrap up, I’ll try to get that up and posted.
Thanks, Lorrie
November 27, 2015 at 10:20 am
Jefferson
This was a really fun first quilt project for me and my daughter and son-in-law loved it!
December 8, 2015 at 2:44 pm
Megan
How do I adjust the measurements to fit a Twin bed. It seems to be wide enough but not nearly long enough. Am i mistaken? Suggestions?
December 8, 2015 at 2:59 pm
Lorrie
Hi Megan!
You’re not wrong. It is wide enough but not quite long enough which is why I explain that on our bed we just pull it down where we like it and use a pillow at the top. If you’re following the tutorial, and you’d like it longer just add a more rows to the bottom or top to get the length you like.
Here’s what it says on the blog about the length….
***Standard mattress sizes for a twin measure at approx. 39″x75-79″ and a full measures at 54″x75″.
This quilt KIT will fit a twin and provide a drop over the mattress on the sides. It will be a few inches shy on the length, but a pillow at the top fixes that:) We keep the sample MineCraft quilt on the twin in the studio, and it looks great!!
If you’re going to make it larger and you’re purchasing the fabrics yourself instead of using a kit, I’d probably look at getting at least an extra 1/3 yard per color in the greens so you’ll have plenty to work with.
If you have any other questions, I’m happy to help!
Lorrie
December 30, 2015 at 11:31 am
Julie
Hi, I was just wondering what the purpose of pressing each row in alternating directions is? Thanks!
January 1, 2016 at 4:54 pm
Lorrie
Hi Julie!
Pressing the seams for each row in alternating directions will allow the seams to ‘nestle’ into each other when you begin to sew the rows together. It’s eaiser to get the seams to match and they will lay flat.
Thanks for stopping by & have a Happy New Year!
Lorrie
August 25, 2016 at 9:08 am
Sandy
Lorrie I have a question I’m wanting to make bigger size 54×72 but I don’t see the amounts of fabric to get for larger quilt ?
Thanks Sandy
August 25, 2016 at 9:50 am
Lorrie
Hi Sandy
The larger quilt pattern is included in the kit and is available upon request. I’ll shoot it over to your email in a bit.
Thanks!
August 26, 2016 at 8:33 am
Sandy
Sorry I didn’t think it posted both my messages !
Ok thank you
September 4, 2016 at 10:01 am
Patience Desmond
HI I was wondering if you had the number sequial posted anywhere?
I have mine lined up 1-5 but I’m not sure of the color on the second row? It’s not to clear on the drawing, some of the fabric look the same in the picture? Please HELP!
September 4, 2016 at 12:35 pm
Lorrie
Hi Patience
I do not have them numbered. I just laid them out in a way that looked best to me. Play with the greens until you think it looks best!
Lorrie
September 4, 2016 at 5:02 pm
Patience Desmond
Hi Lorrie, I only us greens and black? Because the picture looks like it might have a tan and yellow and white in it?.
September 4, 2016 at 5:07 pm
Lorrie
Hi Patience
All of the assorted green Kona color names are listed in the supplies at the beginning of the tutorial.
September 6, 2016 at 11:20 am
Patience Desmond
Hi Can I buy the black skull fabric from you, Lorrie? If so how much is it and can you send me an invoice for the 3 1/3 yards? I’m making the creeper for my grandson, he loves mine craft. Thanks, Patience.
October 5, 2016 at 2:24 pm
Hallie
Hi! Are these kits still available?
October 5, 2016 at 2:26 pm
Lorrie
Yes they are Hallie!
December 19, 2019 at 9:52 pm
Michelle Hafke
The instructions were easy to follow. It was an easy project and I was able to find minecraft material for backing. My Grandson is getting it for his birthday he will truly have a one of a kind quilt to keep him cozy during the winter months in Wisconsin.
December 20, 2019 at 10:39 am
Lorrie
Thanks for the wonderful comment Michelle. It’s important to have as many quilts as possible in our cold winters up here! Stay warm and have a Merry Christmas
Lorrie