
You are currently browsing the category archive for the ‘handmade’ category.
As you know, Wendy and I get together during the week to work on projects. Sometimes they end up in the garbage after a hard days sewing..and no, not just because we might be day drinking…and other times the universe smiles upon us and we each walk away from the day with a little something special that we can pat ourselves on the back for.
Yesterday was just that sort of day! We’ve been wanting to make this Lollipop Bags pattern from Atkinson Designs for a while now and since we have the pattern available in the shop, then there’s no better time for a pattern review for everyone who’s thinking of purchasing it.

I assured Wendy that, as with any Atkinson Design I’ve tried, the pattern would be easy to follow and have clear instructions with photos. I was right. Her signature zipper instruction was good…step by step and at NO time did I think to myself…how’s this gonna work!?! You will never fear another zipper again.

Even the cute fabric flower was a snap to make. The hardest part of the pattern was just taking the time to turn the flower strip inside out.
The only thing I think I’d do different, is add a light weight fusible interfacing to the clutch strap for more stability and I might mix it up a bit by quilting my next one. You could even personalize it with a charm zipper pull, especially if you’re going to leave the flower off.
Other than that, I’d give this pattern an A+. It’s cute. It’s easy. We finished two in one day!

What are the other treats besides Lollipops, you ask?
We have lots of new patterns to add to your to-do’s for this year in the shop. Click HERE to view all of the patterns we carry in the SewModDesigns Etsy shop.


Minor left-behinds and forgottens…
For Paige. A market tote that was 90% completed. Finished at our January sew-in.

For Me. A Sophie bag made from a yard of quilted fabric.

The quilted yard spent so much time tucked away, I didn’t have any more of the matching binding, but I do believe I’m glad! Because I’m totally in love with the black polka dot. It makes the bag fabric pop alive don’t ya think?!

For Wendy. When cats fly…Another quilted yard turned into a carryall bag. Made by Wendy during one of our weekly therapy sessions.

For ZombieGirl. A zipper pouch. Leftover fabric from my bag embellished and monogrammed for her sewing accessories. It’s my job to teach ZombieGirl that Sewista’s are stylish!

A trip to the Double Dutch Manor quilt retreat a couple of weeks ago for Paige was exactly what she needed to refresh her creative spirit.
Double Dutch was a terrific hostess. They provide all of your meals, so no cleanup. You can just get right back to your sewing!

Located just 50 miles outside of Chicago and near major highways, makes it easily reachable for people coming from Indiana, Iowa, Michigan, Minnesota and Wisconsin.
They have the cutest rooms too! I love the blue one, called Old Dutch.

And plenty to do in the area too. The local quilt shop, Prairie Stitches Quilt Shoppe in Oswego, gave out $25 gift cards. Because every quilter needs more fabric, right?!
Paige finished up several projects, including a couple of Sophie Bags.
I actually thought of stealing this one when I photographed it. I’m in love!


What did she spend her $25.00 gift card on? Zippers! And what did she make with those zippers?
Diddy Bags

Wendy worked on a few baby blankets & napkins using our tutorial.

Friends, food and sewing projects. What more could she ask for!
I did not attend the weekend of fun but I did manage to accomplish a few things.
I made this handy dandy bunk bed caddy. I really thought a kid would like it since they usually just toss all of the toys under the bed. This is beneficial for mom and child! I used Riley Blake’s Geekly Chic Records. But I had to wonder…does a nine year old even know what a record is? Lol! We are down to the last yard of the record fabric. So get yours while you can!
Mine was inspired by a tutorial found here. I added fusible interfacing to all the parts and didn’t bind mine but instead turned in the sides and top stitched.

Finally a project to use my buttonhole attachment for! Look for a buttonhole tutorial coming soon….

A Minky Blankie for a Build A Bear using our tutorial. Easy peasy! I had planned on making ‘Minty’s‘ clothes too, but happily found out that the newborn size at Target fits just right and at only about $8/outfit!

And I made Daisy a new dog harness. Cause she chewed through her last one darn it! But even though she did that, it still lasted longer than the one I had bought at Petsmart.

I’ve been making the harness and leashes since she was a pup. The hardware is a much better quality than the store bought ones and I can customize them for each holiday if I wanted. They take about an hour to make. Pretty simple. The only hard part is sewing around the hardware.

So see, handmade is better!
Just jokin y’all. I did not accomplish all of this in one week. But I did manage to write 3 blog posts this week so I’m counting that alone as a win!
I’m just here to do a bit of show ‘n’ tell for you. Maybe it’ll provide you with some inspiration to get moving on some of those projects that you’ve been wanting to check off your list.
My Glimma bag is complete. I quilted it myself with very few naughty words. And you wanna know how? When you free yourself from the idea of traditional perfection and become inspired by the works of Jacquie Gering, you’re able to create without boundaries. She recently visited us at the CLMQG. I’ve been lucky enough to have had the pleasure twice now and I’m amazed at her work each time. If you get the chance to see her in person, take it. You won’t be disappointed!

I quilted it with free motion lines. I didn’t draw them on first. I didn’t measure anything. I just went for it! And guess what? I’m in love with my new bag!

The pattern is a design by Paige called the Sophie Bag and will be released shortly so that you can make one for yourself! It’s big enough to use for your overnight stays. It can carry your favorite quilt, pillow and girly accessories. Wouldn’t this be great for all those stay over parties your teen goes to?

I made this pillowcase for a big Detroit Lions fan using this tutorial from Twiddle Tails. This fabric is a bit hard to find in Bears territory!

I finally..luckily…found some on my last trip to OKC. Hard to believe that I had to travel 700 miles when Detroit is right up the bend! Anyway, just glad I did!
Do you MineCraft? Seems to be all the rage for the kiddos on Xbox. This quilt was a birthday gift. It’s called a creeper. He blows things up of course:)
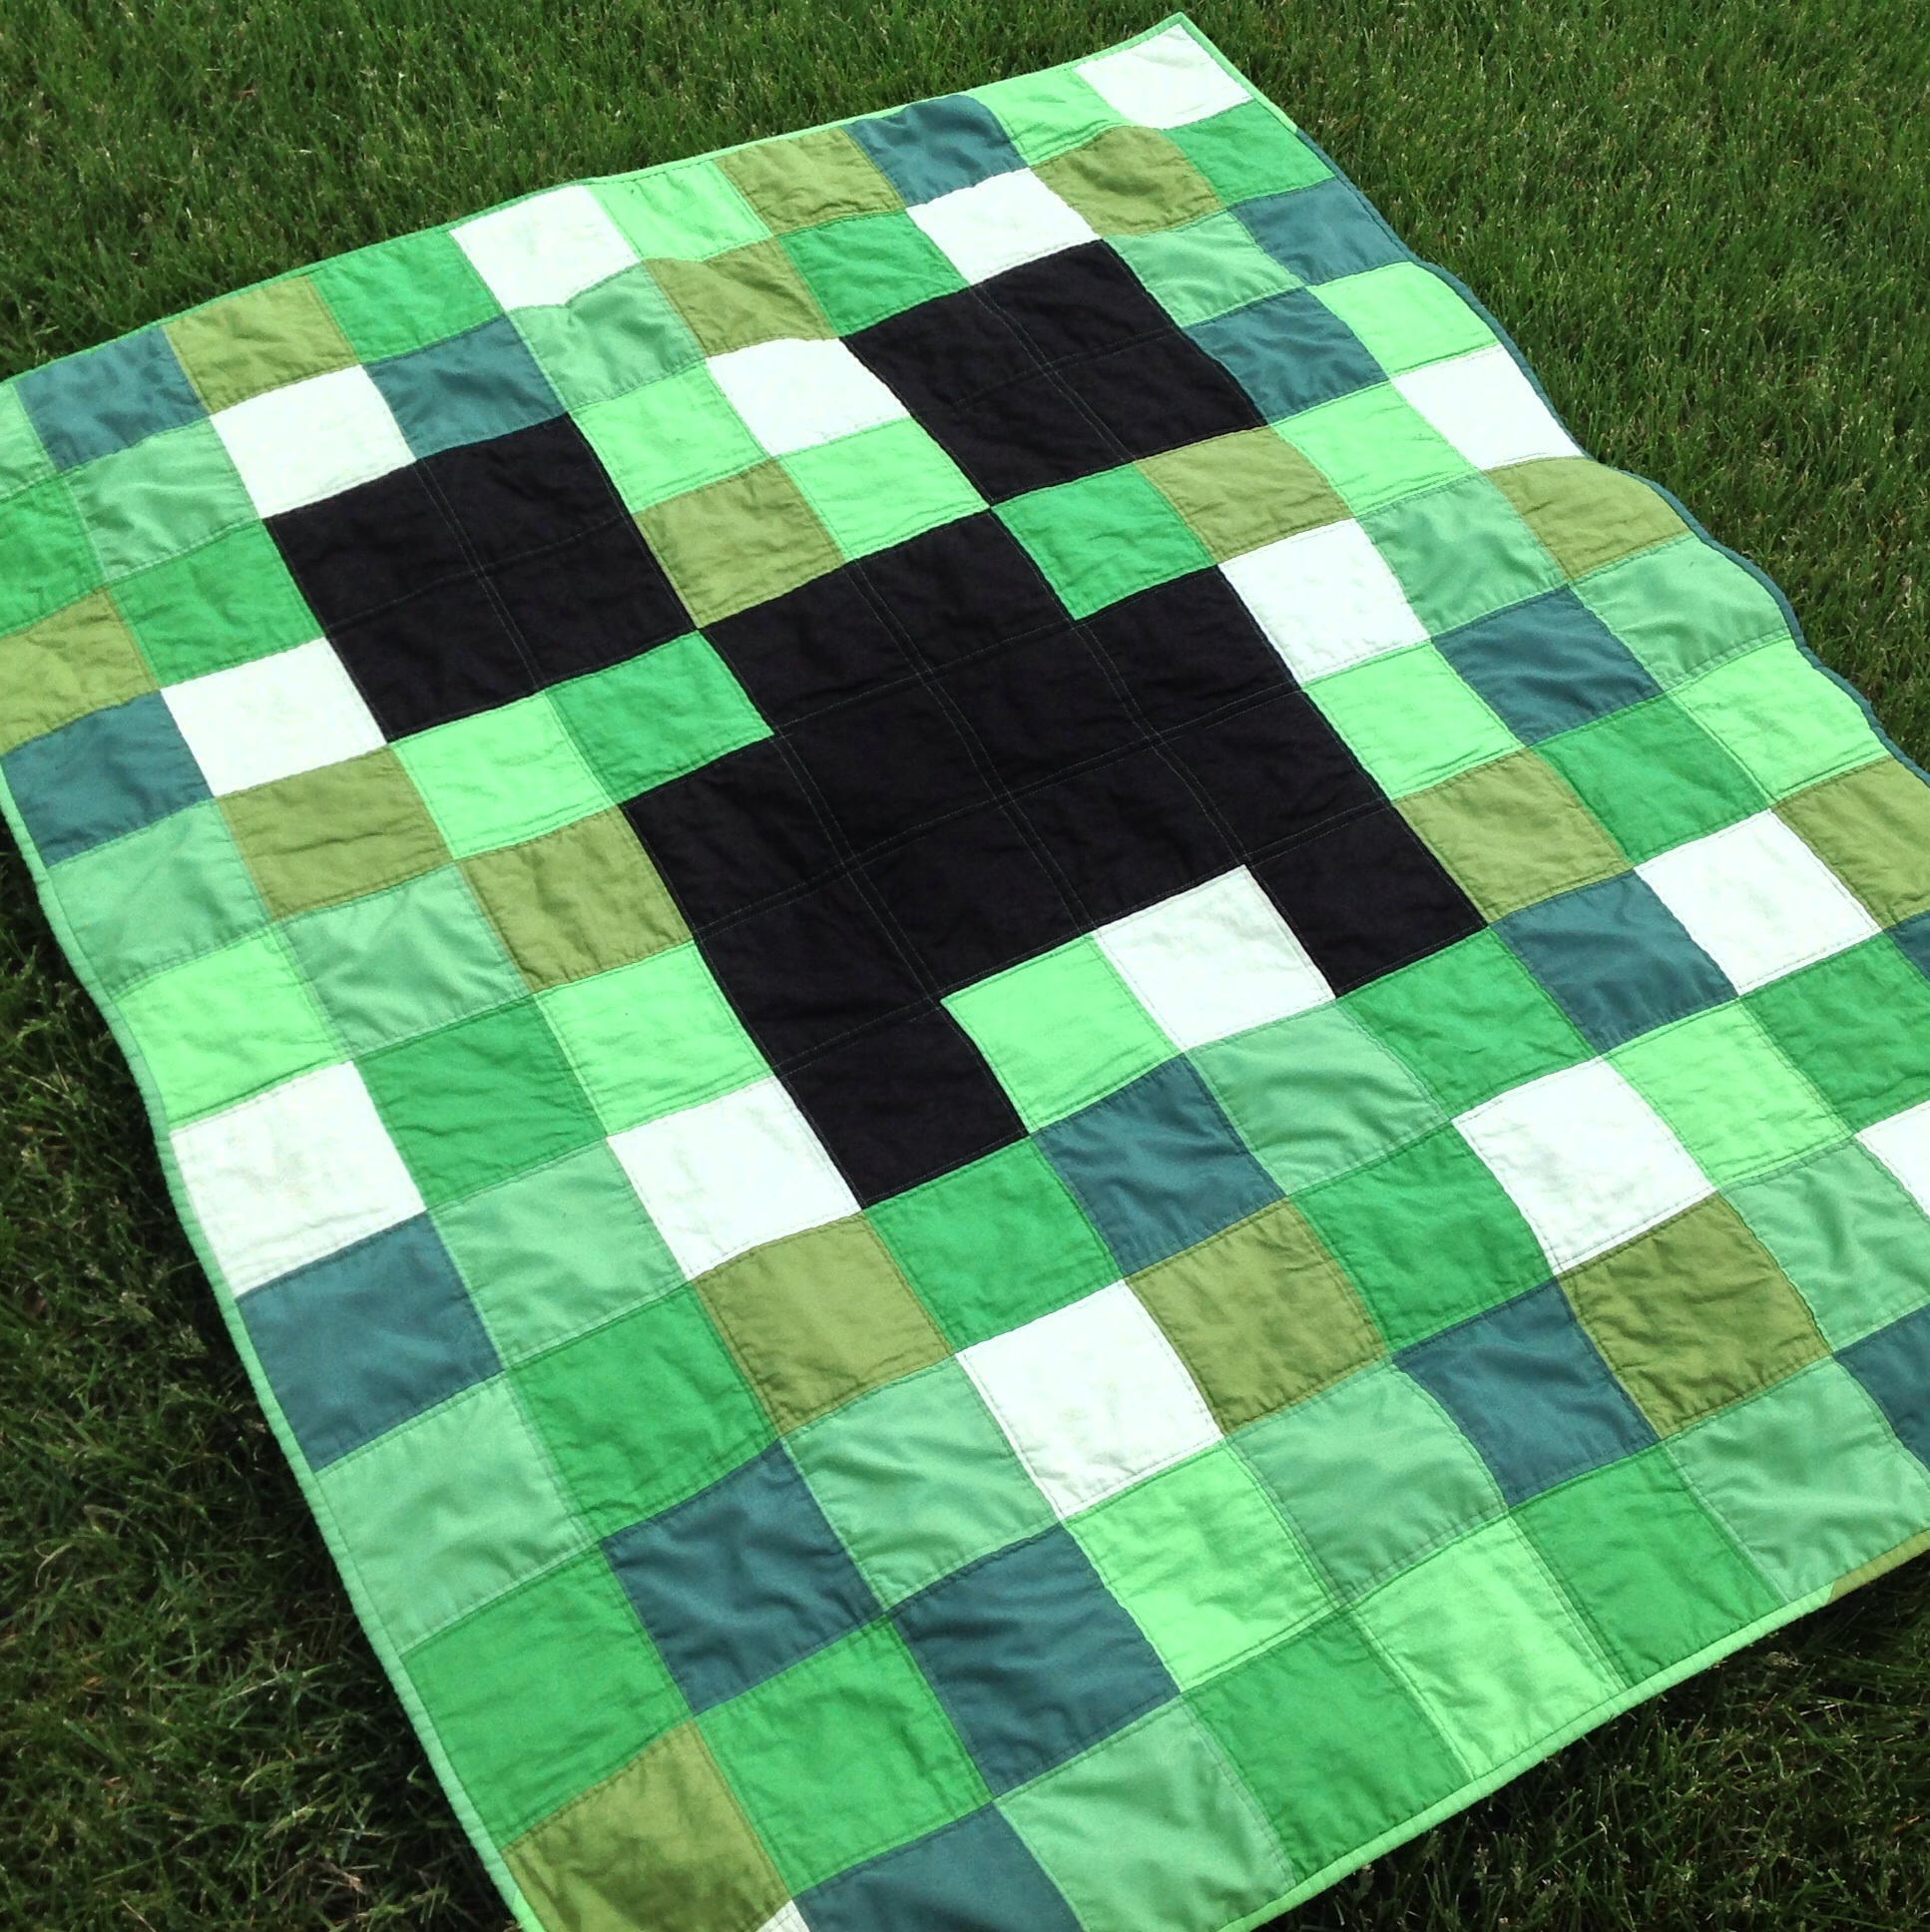
I used money fabric for the back. It has nothing to do with MineCraft but I knew the little guy would like it. And I was right because when his mom took it off his bed to wash it, she discovered he was hoarding actual money under it! …kids, right? :)

This is a duvet that me & Wendy made for a toddler bed. Yes, another sample of what to do with Glimma…

Check out this shortcut using snap tape that can be found at your local Joann’s. It’s twill tape with snaps on it to use in place of buttons or Velcro. I’ve used it twice now to make duvets. A little expensive but that can be helped with a 40% coupon!

And last..this travel notepad and crayon holder for your little one. An easy tutorial provided by Modern Maven. Took us only about an hour and she loved her special gift.

So tell me girls…What have you made lately? Have you made anything using our SewMod fabrics? Or maybe something that I’ve shown a tutorial for? Send me your pics at sewmod at hotmail.com. I’d love to share them on the blog. We could have a customer creates blog day!
Why?…For more fabric of course!
To help me stay on budget and keep track of my spending, I thought I’d use a cash envelope system. Bigger expenses are debited straight from my checking account, but for $$ spent on hobbies, entertainment, groceries and things like Daisy and hair/salon appointments, I decided to make fabric envelopes so I didn’t overspend.
No one said that being more responsible couldn’t be stylish and crafty. I found a tutorial on Moda Bake Shop and, being more responsible, dug into the scrap fabric bin to make me & the girls a set of fabric envelopes.
So simple. Using just two 7.5″ scrap pieces, white fabric for the label & fusible interfacing per envelope, I made 13 envelopes in a couple of hours time.
For mine I picked the Home Grown DIY panel from Blend Fabrics.

I wanted to use the words “Sew”, “Ride” & “Bake” for the front of the envelopes and use the pictures for the back. I cut the piece in half and sewed them back together so that when I was finished, the “word/picture” would be right sides up.

I used a black Sharpie to write my labels.

I made my set last and actually ran out of interfacing on the “Bake” one so I left it out since the instructions say it’s optional. Don’t skimp on the interfacing. It’s so much better with the extra firmness.
I believe they are adorable if I do say so myself!

I tried to pick fabrics from the bin that I thought each of the girls would like. I choose Heirloom by Joel Dewberry for Wendy.

And used coordinating Oval Elements for the inside of these.

For Paige, I chose Art Gallery prints. She loves Blue!

Now we just need to put these to good use. Head over to the Moda Bake Shop tutorial and start sewing up a plan to save for yourself so that you can save more money for fabric too!
I’ve used cloth napkins so long, I feel GUILTY when I reach for a paper towel. My Grandma made me some for Christmas about 15 years ago with matching place mats and after I moved away from OKC to Chicago I thought about her every time I used them. So not only are cloth napkins the “green” way to go but I’ve also developed a sort of comfort attachment in some way I guess.. I tucked those napkins and place mats away for safe keeping and I’ve just gotten around to replacing them and I’m going to give you an easy tutorial on how to make some for yourself.
Over the years, I’ve used several methods for making napkins. From one-sided to the fancy ones that are doubled-sided with mitered corners..these are reserved for the holidays,

but today we are just going to make double-sided with a top stitch.

The pic above is from the “I Glimma All Over The Place” blog post about a month ago and those napkins have been tried and tested through many washes and I am here to tell ya that they look and feel like new! So don’t hesitate on going green yourself… let’s get started on your own set!
I used fat quarters for mine but you can use up some of that fabric from your stash by cutting 18 ” squares. You will need 2 per napkin.

Place your (2) 18″ squares right sides together. Pin so it doesn’t shift while sewing.
Using a 1/4″ seam allowance sew all the way around the fabric, leaving a 3-4 inch opening for turning.

Clip the corners, being careful not to cut through the stitches.

Turn right sides out through the opening. I used this handy little thingamajig to poke my corners out nicely. Just make sure you don’t push too hard. You’ll push right through your seams.

Press, making sure to turn in the openings raw edges.

Top stitch close to the edge on all sides to secure the opening. This helps keep the fabric from shifting and will help it lie nicely over time.

And you’re all finished! Now go make a nice meal for your Babe or Sweetie to compliment your pretty napkins!


Make sets for your holiday table..

Or gifties for your friends. They’re sure to be impressed!
Have you met Wendy? She’s the newest designer for SewMod. Wendy is a longtime Yogi and creator of YogaMod. Being a Sewista and health conscious, it’s only fitting that her first design be reflective of that.

She’s designed a Yoga Mat Sling with Fashion, Form & Function in mind.
Fashion: She uses the latest modern fabrics. The possibilities are endless when it comes to personalizing the sling with all of the trending fabrics. You could have one made for each outfit!

Form:The Sling is versatile and can be worn over the shoulder or across the body.The metal hardware keeps it secure and your mat won’t slip. The length is easily adjustable using the loops. Bring them closer together for a longer strap and further apart to shorten.
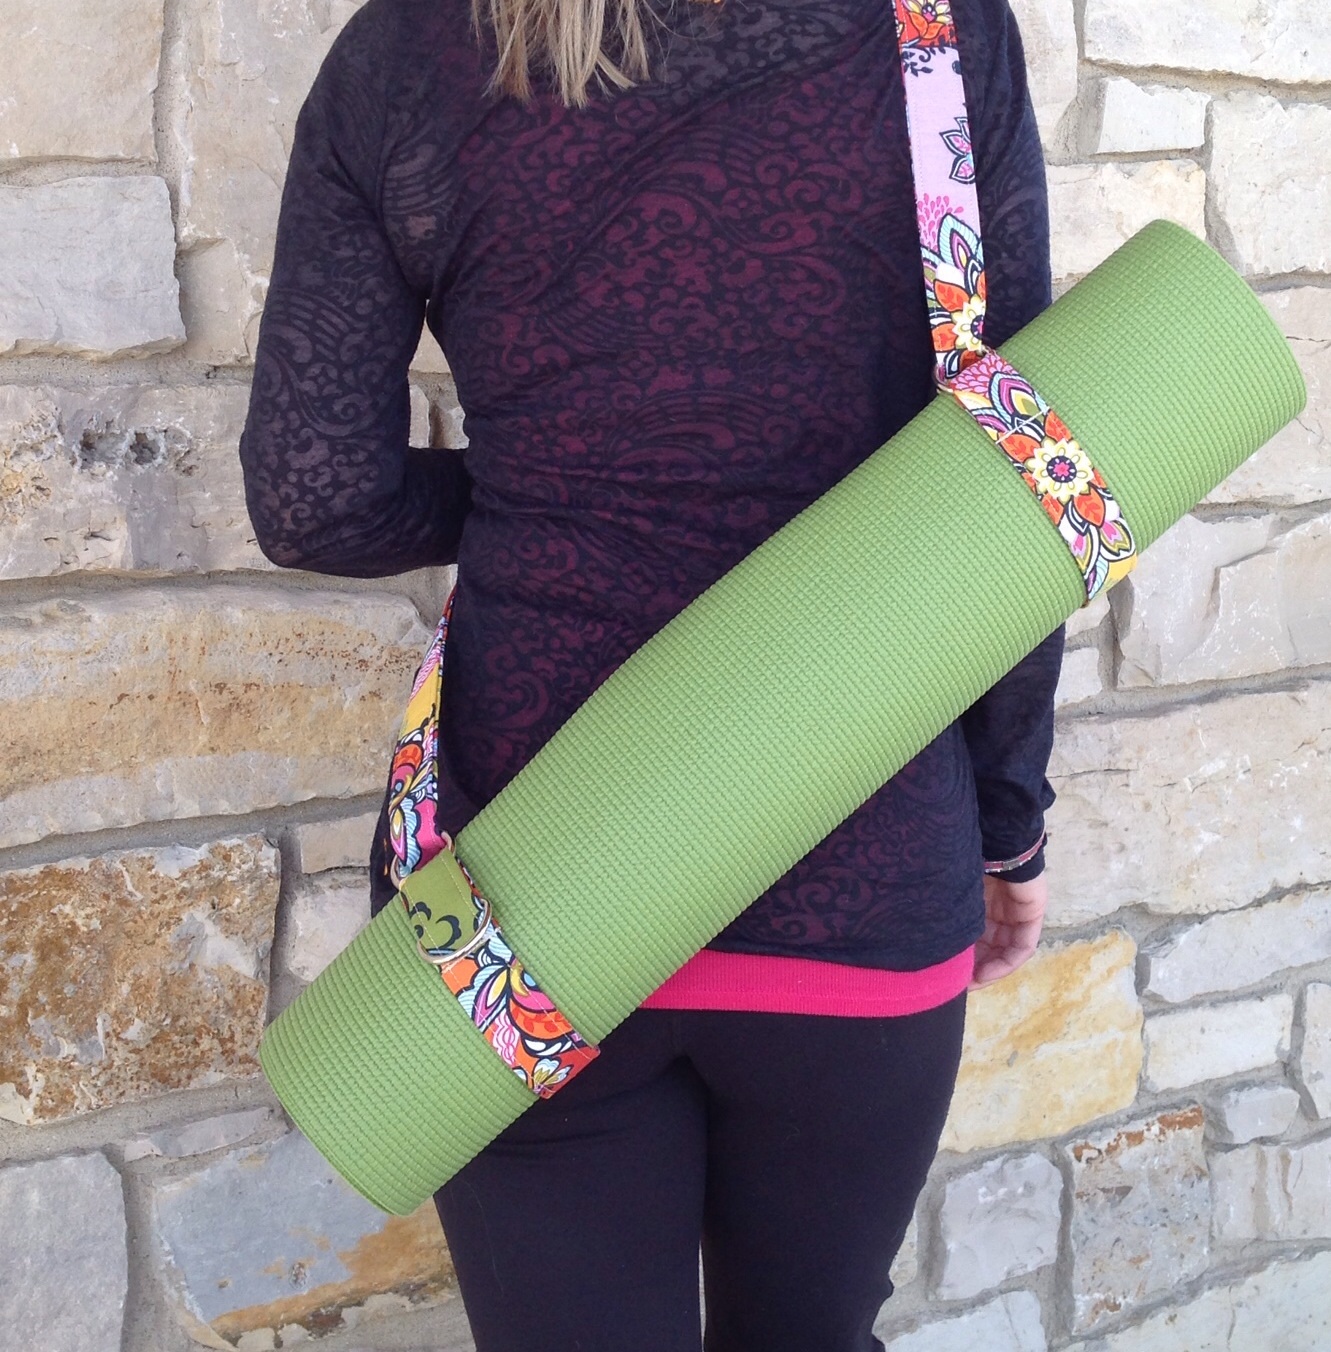
Function: . The Sling can accommodate more than one mat or a towel.
The extra D-Ring allows you to attach your keys, small wallet or a personal accessory.

The pattern is in a downloadable PDF and hard copy and it’s designed with step by step photo instructions making the assembly easy peasy! We have the Sling available in pre-cut kits including the metal hardware. And we also have the option of buying one handcrafted by SewMod. So stop by the shop and check them out!
We look forward to more ideas Wendy has to share. And maybe she can also provide us with stretching and relaxation techniques too. I know we could all use that after sewing all day!
Can I just tell you how obsessed I am with this Lotta Jansdotter line, Glimma? It’s a good thing we carry it in the shop…or maybe for y’all it’s a bad thing cause I’ve personally used most of it now. I know she has a new line out now, but I haven’t finished using all of the first one up!
I like it because its gender neutral. Don’t get me wrong..I’m girly, but some people in my life are not so partial to flowers and rainbows(aka…boyfriend). He’s cramping my style on all things pink!
I’d like to show you what I did with a Glimma Fat Quarter Bundle. First we kitted Cannon Beach with it. 20 fat quarters are required to make this, not including the background.

After the quilt top is cut and appliqued, the backing is trimmed away to reduce bulk and I was left with this messy pile that screamed…Make me ‘Glimma’!

So I obeyed. I decided to make a bag to hold, well just about everything including the kitchen sink. Paige designed Sophie’s Bag and everyone has one but me..guess I’ll have to make my own, Paige:) it requires just 1 yard of quilted fabric. First thing I did was take the trimmed backing and cut into useable sizes, and I sewed it together to make the inside piece and handles for the bag. I then just cut as many leftover Glimma pieces as possible into random squares and rectangles to ‘piece’ a top.

Design away! Just try to keep your dog from thinking it’s her new blankie:(

And this is my new yardage for my bag. And no, I have not finished quilting it. Y’all know how much I hate to quilt! But it’s coming along and soon, hopefully by next week I’ll have an update on the finished bag.

So, while you wait patiently while I curse and cry through my quilting, let me show you what I did with my second Glimma fat quarter bundle…
I had serious unruly grocery store bags. My organizational OCD demanded I contain them so I searched Pinterest for an easy sewing project. I made this in about an hour. And yes it’s surrounded by all things pink:)

Then I made these double sided napkins with the rest!
But wait, there’s more! Wendy made a clock for her sewing room out of one of them too.

I still have a tiny bit left over from my bundles….scrappy potholders perhaps?
So, my lack of blogging in the latter part of 2012 is embarrassing to say the least. I was busy though, I promise. I’d hate to think you guys thought I was just goofing off and being unproductive so I’ve gathered a few pics of some of the projects/fun things that we were up to.
Here we go… This is a commission quilt we made for a customer we met at Madison this year. Made for her granddaughter, Mimi. It’s a modified Sassafras. I tagged this one “I’m a Barbie girl”. It was so so very pink and girly!

This

Became a very popular one of these…

Did a lot of daydreaming about one of these…

All of those hexies I made became one of these…Is this the cutest place mat or what. Still workin’ on my 2nd one! This was a sample for when we were asked to vend at a local Modern Quilt Guild. We did a demo on hand and machine hexies.

We made a commissioned breast cancer throw for someone’s Christmas gift.

Started a spool quilt with Elsie’s Girl, Shelley, which we work on weekly. This is my progress so far…

I had some life changing decisions thrown…definition(Pushed or forced violently and suddenly into a particular state.) upon me. Which caused this…
And let’s just say this…you can’t hide from Karma peeps. At least I’m hoping anyway;) More on that subject at a later date.

Spent a total of 3 weeks over the last 2 months like this. Which probably was a result from all of the stress caused by the above…

Had a Christmas crafting party..

And we made these cute button trees…This one’s mine.

And this is Paige’s..

New fabrics arrived at the shop. We now have all of the Oval ELements in stock and this great new line from Blend called Gabbie. You can find it here…

Did some of this…

But then ate a lot of this..

We found a perfect cupcake stand for SewMod. So we ate even more of this deliciousness just to decorate the stand….

Paige and I went shopping and found these SewMod Christmas decorations in our colors…

That matched these trees! How could we possibly resist…It’s Christmas, SewMod Style!

Spent some time catching up with the nephews in OKC…

And finally made more progress on my December fun project, Rendezvous..

Whew, 2 months of blogging done! Here’s to a great 2013! We made a lot of progress this year and we couldn’t have done it without all of your support. We made wonderful friends and met so many people thru social media and our experiences at the quilt shows and local guilds. Thank you everyone! We are looking forward to another exciting year!
One last handmade Friday before Christmas. It flew by so fast. I can’t believe we’re only a few short days away. There may not be time to make these super cute and quick placemats, but you can add them to your list for next year. Or why wait for Christmas. These would be great for any occasion you need a quick gifty. I whipped these up pretty fast and all made from mostly scraps. I even quilted them myself, which if you know me, usually involves some degree of whining. No whining or naughty words. I promise…easy peasy!
")
This free pattern comes from Elizabeth Hartman from the Oh Fransson! blog. You can find the pattern here.
I rolled them up, tied them with a pretty ribbon and gave them away with a casserole dish.
")
Here’s a set that my SewMod friend Andrea made up with some of the Bespoken fabrics. Check out her Funky Placemats Flickr page. She’s made several cool ones!
")
Very nice! Thanks for great idea Andrea. I will definitely be making more.


