
You are currently browsing the category archive for the ‘Need2Create!’ category.
We had such a great time getting together this past weekend to teach the Patchwork Glamper. Spending the day before Mother’s Day sewing, chatting and crafting. What more could a mom want to start the weekend off.

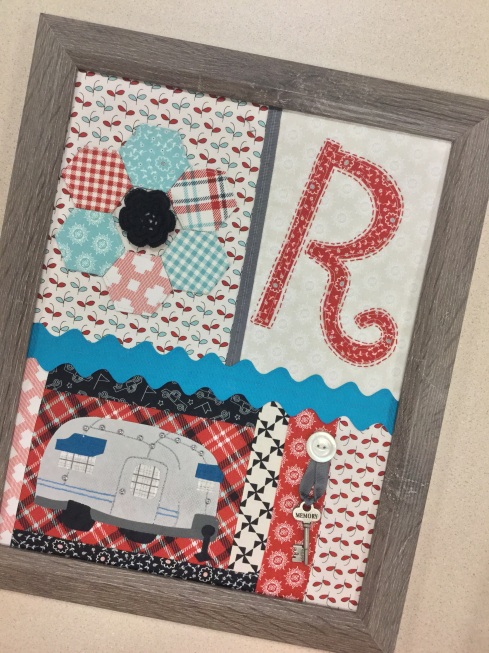
The Patchwork Glamper is a fun way to incorporate all those trims, buttons and embellishments you’ve been stashing and a great way to learn many skills like English Paper Piecing (EPP) hexagons and embroidery with low commitment.
It’s so fun to see how each persons creativity shines through when we hold workshops or customers send us pics of items they’ve made with our patterns.
This design is so flexible and forgiving. Each of the girls work was unique. For example…A few of the girls decided to leave out their center hexie and let the flower be the focus and the background fabric shine through.

Or design your own camper to add to the work. Ann wanted her camper to be similar to the one she travels in so she designed her very own and added a little bling.

Or how about how Wendy decided she’d rather have a pillow and tweaked hers to be more square. Check out her cute puppy button in her center hexie!

Jalana had a great idea to repurpose the burlap from a bouquet she received. And check out all the details she added to glamp up her work…her wheel is a adorable!

Jen’s Glamper is so bright and cheery! Her first time at hand sewing hexies and embroidery work. Great job Jen!

Ann finished and framed her Glamper. I think I’m now partial to the tilted letter. It gives it a whimsy feel.
The workshop was so relaxed that us teachers even got in on the action. Paige used her time to refresh her hand sewing skills.

And I finished up my sample while I showed the girls the techniques.

Thanks everyone for participating. We had a great time!
Contact me if you’d like SewMod to come teach a Patchwork Glamper class. You can find all of our workshop info here.
Catch-up part 2…So more on the subject from yesterday about ‘slowing time down‘…
I was so focused last year on refocusing SewMod that I stayed constantly busy and barely left any time for myself. Owning your own business can sometimes leave you ‘working’ more and ‘enjoying’ your craft less. I do have to say though, all of that hard work does have its benefits. SewMod had its best year ever and continues to grow. In 2015 I chose to regroup and send SewMod in the direction of more quilt kits and less fabric on the bolt. With the ever increasing online shops popping up, making my way as a small fabric shop on the Internet became difficult and I knew I needed a new game plan. I began providing you with affordable kits, most of them complete with backings and patterns, along with tips and tricks on the blog, focusing mostly on baby.
Most or all of the fabrics I order come into the shop with a preplanned purpose of kitting. The kit sample is made, the fabrics are immediately cut and kitted, and the fabrics that are then unused for the kits and left on the bolts are sold in the Esty shop or precut for quilt shows.
This method has worked wonders for SewMod. I think I may have found my groove and I only have y’all to thank for hanging in there an being such great friends and customers while I try to figure everything out. I really do appreciate you!
So while I completely transition SewMod over to this new method that’s worked so well, look for some upcoming sales. The first one will be for our CLMQG guild sew-in for January. I’m bringing all of the bolts from the Sale category on the Etsy shop and selling them for $5 a yard. If you see something you like guild members, just convo me and I’ll set it aside for you! Please bring cash for this event.
And while I do enjoy kitting up all of the cute baby kits and sewing with all of the beautiful fabrics for you grown-ups too, I still want to leave time for myself to create something just for me. One of my New Years resolutions this year is to set time aside each month to create something that’s all mine. Something pretty. After all, SewMod’s tag line has always been Need to Create. And I know by doing this, SewMod as a whole will benefit from it too. And hopefully, I’ll not only be more creative, but I’ll inspire you as well.
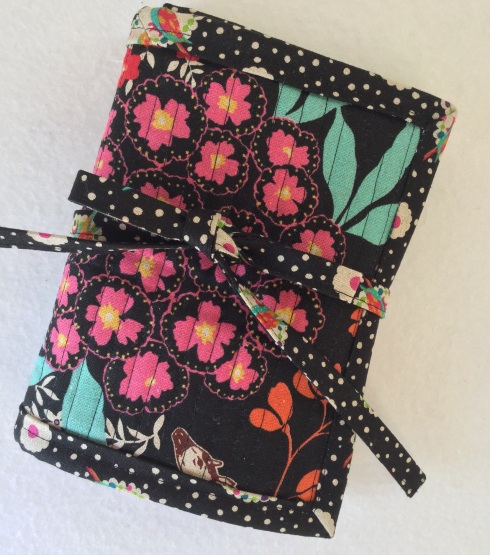
So along with making myself the Classmate for Christmas, Paige and I got together for a sew day at the end of last year and worked on Lella Boutique’s Goody Goody Binding Kit. A traveling kit that holds your thread, binder clips, needles and scissors. This is genius, especially since I’m always working on a binding while I’m in the car. And did I mention that’s it’s so stinkin’ cute?!
You can find her complete step-by-step instructions along with with photos on her blog if you’d like to make one too. This project can easily be finished in one afternoon.
I made one for our guild Christmas swap.

And filled it with all kinds of ‘goodies’.

Amd one for myself.

I used all of the girly fabrics I like. The front and inside is Riley Blake’s retro Dresses fabric, my pocket is a bicycle print with flowers overflowing from the baskets, and of course, some polka dots! Whenever I take my quilts on a car trip for binding I always travel with the bobbin instead of the spool. So on mine, I added a piece of tiny ric rac and a button wrap closure instead of the Velcro thread holder which suits your Aurifil spool nicely.

And this one is Paige’s. She used some of her Echino fabrics and also adapted hers for the bobbins also.

Well done Paige! I love the fussy cut deer and that whimsy button!
Stay tuned…more catch up coming this week!
Yes. I’m a couple of months late on this beachy keen post. Even as I write this I’m thinking of fall, pumpkins, what to dress up for Halloween & wearing my Uggs, oh and apple cider doughnuts! Yumm..
So let’s take it back a bit. All the way to the middle of July. Schools out, the sun’s shining & the weathers warm. All we wanna do is hang out for lunch, have margaritas and enjoy the lazy afternoons….and it’s time to celebrate Paige and Wendy’s birthday!
I wanted to make their gifts this year…well, my mom did most of the making. I mostly did some attaching:)
Something fun & colorful was a must! I found these totes out shopping one day and scored big time with the robins egg blue handles. I bought them, a lot of them, and knew exactly what I wanted to do with them.

From that to this…nailed it, right?!

I embellished them with some bright and modern crochet doilies and flowers handmade for this project by my mom.

A bag to use as a purse for a day out shopping or to use as a tote for a fun take-along project! Wouldn’t these make great bridesmaids gifts too?

I didn’t stop with the totes. I took dollar store flip flops, crocheted flowers, and a bit of blue yarn..

and turned that into a sweet pair to be worn with white capris or a sundress.
All I did was wrap the flip flops with the blue yarn and hand sew the flowers on…easy peasy!

Toes to match;)..blue of course!
I took so many feet pics I’m convinced my neighbors thought I’d lost my mind for sure this time.

A huge thank you to my mom for doing the crochet. She’s always eager to help with all my ideas! Even as I write this blog, she’s working on another project for me. I get so excited when we can collaborate. We need-2-create!
Keep checking in to see what we come up with next…

Isn’t it beautiful outside today? …well it was when I wrote this blog:) Sunny blue skies and mild temps make me wanna spend all my time outside while I can. So today I took to the outdoors for a little crafting. I set up all my supplies on the patio, poured myself some sweet tea and enjoyed the weather while I created the sweetest little clock for my moms sewing room.
Today I’m going to show you how to make that adorable Button Clock that everyone has been pinning on Pinterest. So gather up the supplies, beg your mom to make you some crocheted flowers and lets get crafty!

Supplies needed:
Clock mechanism & battery (which can be found at Michaels for about $7)
8 inch Wooden embroidery hoop
2 fat quarters, clock fabric & lining
Embroidery floss
Buttons
Crocheted flowers
Craft paint & brush, pink of course!
Scissors, marking utensil
Chipboard (found in the scrapbook section)
Start by painting your hoop with the craft paint and allowing it to dry.

Trace the inner hoop onto your chipboard and cut out with scissors.

To find the center of your chipboard circle, trace the inner hoop again but this time on a piece of paper. Cut out and fold the paper into quarters. Open and mark the center with a dot. Lay the paper circle on top of the chipboard circle and mark the dot through onto your chipboard. Using an awl or your scissors create a hole where the dot is for the mechanism. Set the chipboard aside. We’ll use it in a bit…

Place your lining fabric behind your clock fabric and tighten securely between the hoops.
Make sure the fabrics are snug and secure by tightening the screw at the top of the outside hoop.
Place your paper circle on top of your hoop and mark the center of your clock fabric with a dot. This will be where your clock mechanism will fit through. Make a small hole with your scissors through both fabrics big enough for the mechanism to fit through.
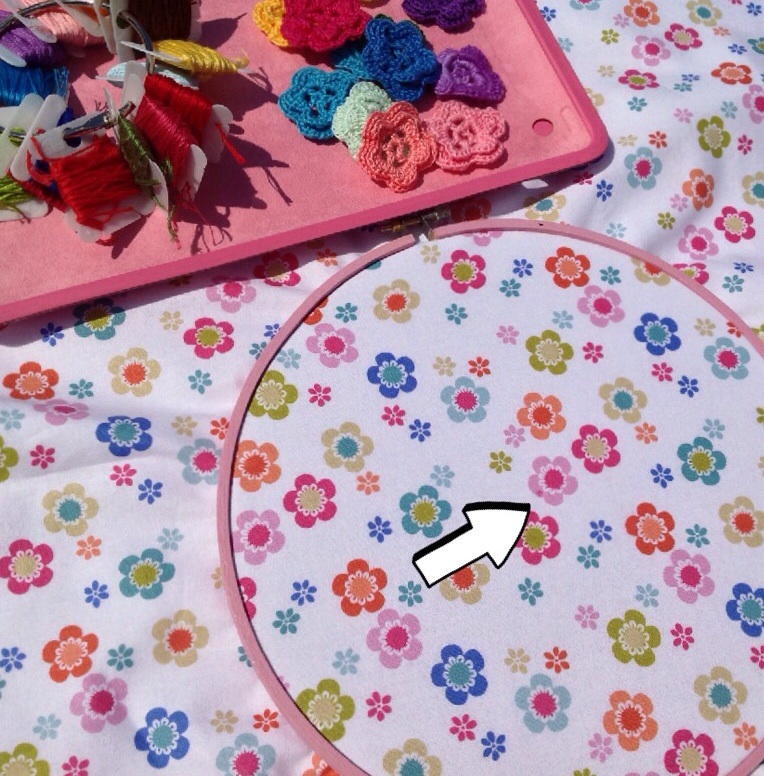
Now the fun part! Attach your flowers and buttons with the embroidery floss. I started with the “12” & “6”. Then the “3” & “9” and eyeballed the remaining numbers.

Once you’re finished sewing the buttons on, trim the piece approximately 2″ around the hoop. Add your chipboard circle to the back. This will provide stability for the weight of the clock mechanism.
FYI I added the clock mechanism before this step as you can see in the pic, but I would recommend doing it last. It made for difficult sewing in the next step:(

Using a piece of embroidery floss, create a gathering stitch in the fabrics. Pull and knot the thread in the back to make the edges ‘finished’. This will help the clock lie flat against the wall when hanging. At this point, most hoop art is then covered from behind for a nice finished look, but if we do that, we won’t be able to change out the clock battery now will we?

Add the clock mechanism following the instructional diagram provided with the packaging. Tip:Make sure to press down and get a snug fit with the ‘minute’ hand. Otherwise it will spin and loose time. I also removed the rubber washer because it created too much bulk and my clock still keeps great time.

Add the battery, set the time and you’re all finished! Pour yourself another glass of sweet tea while you admire your craftiness!


Love this sweet little button clock? Well you’re in luck because I’ve assembled the complete kit and they’re available in the SewMod Etsy Shop. Kit includes the 2 fat quarters, crochet flowers, floss, buttons, chipboard, hoop, & clock mechanism for $25.00. Click on the SewMod link or convo me if you’re interested!
What the heck is Washi Tape you ask? Washi tape is basically a type of decorative masking tape from Japan made from rice paper that can be applied to all sorts of surfaces and repositioned.
What should I do with Washi Tape? It’s all the crafty craze on Pinterest. I even have an entire board dedicated to the idea. Any surface is pretty much up for grabs! Decorate any glass or wood, light switches, vases etc. And since it can be repositioned, it doesn’t leave residue behind. We’ve even put different tapes on wine glasses at parties so we can keep up with whose is whose.
Get the kids involved too. They love this stuff! Let them decorate a journal or wrap it around their school pencils.

Where can I buy Washi Tape?
We’ve found it on Etsy, Target, Michaels and specialty scrapbooking stores. The last tape I bought was from Target and the price was about $2.99/roll. Michaels was 3.99/roll but we’ve been using our 40% off coupon to reduce the price. The variety in the stores is growing each time I look.
I do find Washi to be a bit expensive depending on the project. I can’t even imagine someone actually decorating a table or a wall with it. Aside from the cost can you imagine the time it took to do this? It’s awfully cute though, right?

Organize your Washi!
To keep your tape organized and handy, you can make your own dispenser made from a Saran Wrap box and tension rods. Find this clever tutorial at iHeart Organizing.

This set was purchased at Costco during Christmas and comes with it’s own dispenser!

And some of the tapes will fit your traditional desktop tape dispenser.
What have we made with Washi Tape you ask?
We’ve spruced up dollar store tea lights for the home and decorated some for Valentines Day.

Clear votive candles. These were so pretty while they candle was burning.

And even added some style to our Apple chargers!

Check out my Pinterest board for more creative uses for Washi Tape.
So tell us..What would you Washi?


